I am struck by the clarity of the picture above and how it perfectly encapsulates one of the many joys of childhood. Do you remember your days on the school playground? I do. That mixture of fresh air, warm sun, and the freedom to play as you wished was almost as good as candy to me. Kids yearn to make their own fun, to create. This is what draws them to the playground, and this is also what draws them to the arts. As you read through my lesson ideas, consider how you might give your students that little bit of freedom to create. And if you’re experiencing warm, sunny weather, consider taking your class outside. They’ll love you for it!
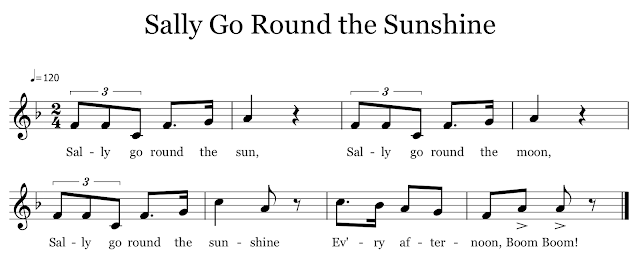
While preparing to write this post, I discovered that there are several different versions of this song. Most of the versions have similar rhythms, but the title of the song and the pitches vary greatly. My version of this song comes from the book American Folk Songs for Children by Ruth Crawford Seeger. Click on the following links to see the other versions of this song: Sally Go Round the Moon and Sally Go Round the Sun. Depending on where your students are vocally, you may find the other versions a better fit for your classes.
MOVEMENT
The game for this song seems to choreograph itself. You’ve probably already guessed what the movements are without me telling you. Students stand in a circle with their hands joined. They move clockwise while singing, and alternate the direction of the circle on the word “sunshine”. Then, they all fall down at the end of the song.
If you plan to use this song to focus the triplet rhythm or accents with your older students, you’ll want to change up the game to suit an older audience. Have your students sit cross-legged in a circle. Have them pass an object around the circle to the steady beat as they sing. The person holding the object on the final “boom” is out. Continue playing until only one student is left. Be sure to give the students who are out something to do, such as keeping the beat with rhythm instruments or tapping the rhythm on their laps.
*be sneaky*
Older students tend to shy away from circle games that involve holding hands and falling down. However, you might be surprised what a little mystery and reverse psychology can do. Try off-handedly mentioning the game you played with the kindergartners, telling them how fun it was to watch them laugh hysterically while you were teaching the song. When your older students ask you for more details, say, “oh, you wouldn’t want to hear about it…” If you’ve played your cards right, your students will continue to ask about the game and how it’s played. If you can keep it going, you may find your older students begging to play the game, and even having fun while doing it!
RHYTHM
This song would be great for introducing or practicing triplets. It’s especially good for showcasing the difference between simple and compound rhythmic groupings. Pull out some of your rhythm instruments and ask your students to play only on the triplets. Though this may be a challenge at first, it’s made easier by the fact that the triplets occur on the first beat of the measure. To add some variety (and highlight the difference in simple and compound), have a separate group of students play only on the final “boom, boom”. Put it all together by separating your class into three groups, one playing the triplets, another playing the eighth notes, and the last group singing and moving. Continue until each group has rotated through.
This song would be great for introducing or practicing triplets. It’s especially good for showcasing the difference between simple and compound rhythmic groupings. Pull out some of your rhythm instruments and ask your students to play only on the triplets. Though this may be a challenge at first, it’s made easier by the fact that the triplets occur on the first beat of the measure. To add some variety (and highlight the difference in simple and compound), have a separate group of students play only on the final “boom, boom”. Put it all together by separating your class into three groups, one playing the triplets, another playing the eighth notes, and the last group singing and moving. Continue until each group has rotated through.
ARTICULATION
Begin a class discussion (now that your students are worn out from singing and moving) about the expressive quality of the music. Ask them leading questions such as:What kind of actions do we usually associate with the word “boom”?
How might we move or make sounds to express that word?
How might we play an instrument to show that word’s meaning?
How might we move or make sounds to express that word?
How might we play an instrument to show that word’s meaning?
At this point you can discuss the meaning of articulation and how accents are used as a form of expression in music. If your students play recorder, have them add an accent to one of the pieces from their own repertoire. Then, discuss how the articulation changed the expressiveness of the piece. If you’re working with younger students, have them add accents to a song they know. Then, discuss how the accents changed the expression of the music.


2 Responses
I love taking the kids outside when the weather gets nice, and this week has certainly been the week for good weather! Perfect timing on this one, thanks again for sharing these awesome lesson plans 🙂 #fermatafriday
Thanks Elizabeth 🙂