The Basics of a Digital Classroom
I love architecture. More specifically, I love the idea of exploring old, vast houses and/or ruins and learning about their history. So when I saw the digital classroom craze hit, I knew exactly what resource I wanted to create, a Musical Mansion. It’s difficult to understand exactly what it is without seeing it, so I’ve attached the preview video I made below to give you an idea of exactly what it is.
If you’re completely new to interactive presentations like this, I would highly recommend you check out my friend Melissa’s Youtube Channel. She has excellent tutorials on how to create a digital classroom; including how to link to different rooms and add your own bitmoji. You can find her channel HERE.
How to Avoid the Dreaded Automatic Navigation in Google Slides
Google Slides automatically navigates to the next slide in a presentation if you click anywhere on the slide. With interactive presentations, this is a huge drawback. If your students click on anything that isn’t a linked image, they’ll automatically be taken to the next slide. Clearly, this isn’t what we want. Here’s how to fix that issue.
- Create a transparent box that fills the space of the entire slide.
- Right-click, select “link”, choose the number of the slide you’re on, and click “apply”
- Make sure this linked shape is below any of the other linked objects in your room. To do this, right-click > Order > Send to Back.
Tada! Now, if your students click outside of a linked shape, they’ll remain on the same slide!
How to Get Rid of the Navigation Toolbar
The navigation toolbar is located in the bottom left corner of the screen and allows you to move forward in your presentation. For interactive presentations like the Musical Mansion, you don’t want your students to be able to do this. Rather, you want them to actually interact with the linked objects, not just use the toolbar. Here’s how to get rid of the navigation toolbar:
- Open up the Google Slides Presentation
- Click the Share button
- Click “Get shareable link”
- Make sure the text says “anyone with the link can view”, then click the drop-down arrow next to it.
- Click “More” at the bottom of the menu
- Choose ”On, anyone with the link”
- Click “Save”
- Click “Copy Link”
- Paste your link in any word processing program, then replace the highlighted text as shown below.
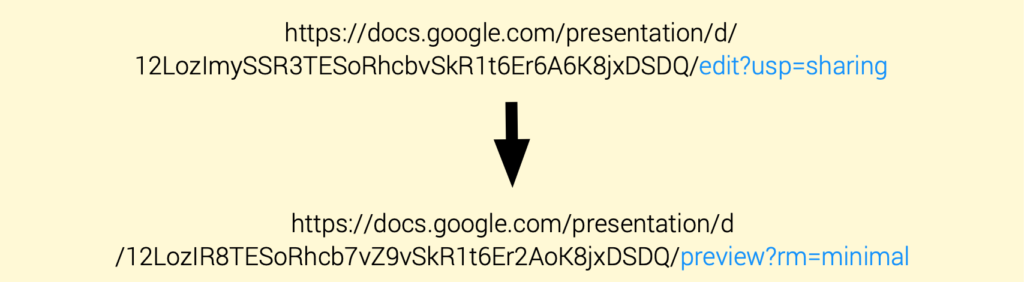
When you share this link with your students, the slideshow will open in presentation mode and won’t have that pesky toolbar.
Show & Tell
Have you created a digital classroom? If you’re new at this, don’t forget to subscribe to Melissa’s channel. Let me know in the comments and share some of your own tips and tricks. I love learning new hacks for Google Slides! If you’d like an interactive presentation that’s ready to go without any of the work, you can download the Musical Mansion HERE.
2 Responses
This is super helpful! I honestly avoided the digital classroom trend this school year but if we are still teaching virtually in the fall will probably do something along these lines. Your tips are fantastic and Melissa’s resources are so useful as well. Thank you for putting this all together!
You’re welcome! I’m glad it was helpful 🙂 It’s a lot of work upfront, but also fun to make. I love how digital classrooms give students room to explore, and I think they’d be great for non-music subs too.